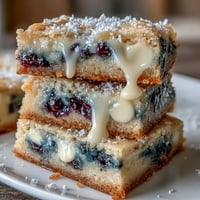
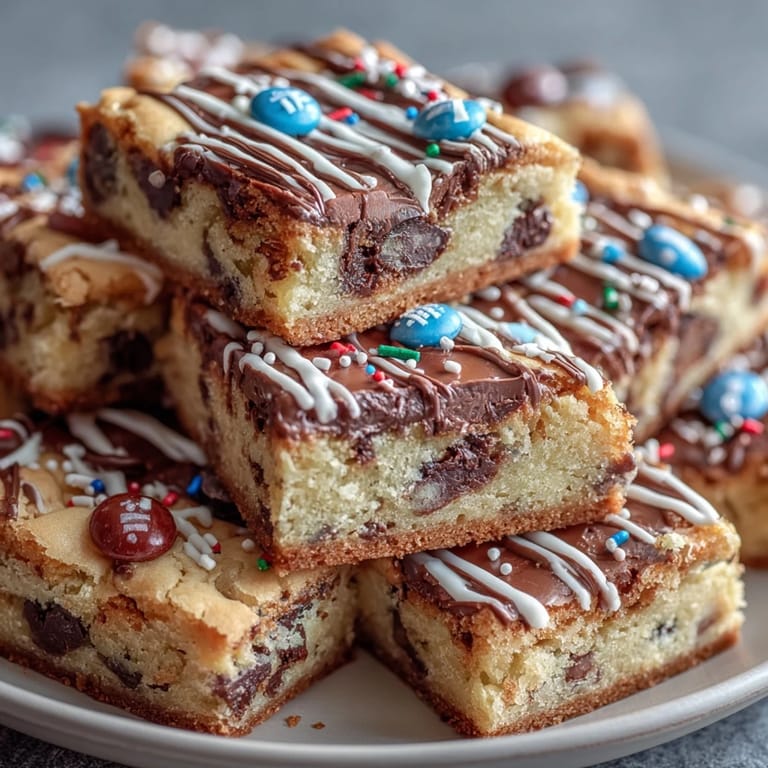
 Pin it
 My neighbor asked me to bring something celebratory to her daughter's graduation party, and I wanted dessert that felt special without requiring pastry skills I don't have. These cookie bars came together almost by accident—I was thinking of classic chocolate chip cookies but wanted something that could feed a crowd and look intentional on a platter. The white chocolate drizzle was the moment everything clicked, turning a simple bar into something that actually looked like it came from a bakery.
I remember pulling these out of the oven while my kids crowded around the kitchen counter, and the smell alone had everyone convinced something fancy was happening. One bar got dropped on the floor while cooling (my fault entirely), but there were still plenty to drizzle, and watching that white chocolate cascade over the golden bars felt oddly satisfying, like we'd actually accomplished something together.
Ingredients
- All-purpose flour (2 1/4 cups): The foundation that keeps these bars tender but sturdy enough to cut cleanly—don't sift unless you're feeling fancy, just spoon it in and level it off.
- Baking soda (1 tsp) and salt (1/2 tsp): These quiet ingredients do heavy lifting by waking up the brown sugar's flavor and making the bars lift slightly in the oven.
- Unsalted butter (1 cup, melted): Melting it first means less mixing time and a denser, chewier texture that feels more like indulgence than lightness.
- Brown sugar (1 cup packed) and granulated sugar (1/2 cup): The brown sugar brings that caramel note that makes people say they taste something they can't quite name, while the white sugar keeps things balanced.
- Eggs (2 large) and vanilla extract (2 tsp): These bind everything and add that unmistakable cookie flavor—use real vanilla if you can, it changes the whole thing.
- Semi-sweet chocolate chips (1 cup) and colored candy-coated chocolates (1/2 cup): The chocolate chips are your backbone, but the candies are what make these bars feel like a celebration instead of just dessert.
- White chocolate (4 oz) and vegetable oil (1 tsp): The oil keeps the white chocolate from seizing up and makes it drizzle-able instead of thick and stubborn.
Tired of Takeout? 🥡
Get 10 meals you can make faster than delivery arrives. Seriously.
One email. No spam. Unsubscribe anytime.
Instructions
- Set your stage:
- Preheat to 350°F and line your 9x13-inch pan with parchment, leaving enough overhang so you can lift the whole thing out once cooled. This small step saves you from broken bars and frustration later.
- Combine the dry goods:
- Whisk flour, baking soda, and salt together in a medium bowl—this ensures the leavening spreads evenly instead of creating random fluffy pockets. Set it aside and don't overthink it.
- Build the wet base:
- In a large bowl, whisk melted butter with both sugars until it looks smooth and slightly glossy, which takes about a minute. Add your eggs and vanilla, whisking until everything looks unified and a little pale.
- Bring it together gently:
- Fold the dry ingredients into the wet mixture slowly—overmixing here is the enemy, turning your bars tough instead of chewy. Stop as soon as you don't see streaks of flour anymore.
- Stir in the joy:
- Fold in the chocolate chips and colored candies, which should be scattered throughout so every bite gets both types of chocolate. The batter will look textured and studded now, which is exactly right.
- Spread and bake:
- Pour the batter into your prepared pan and smooth it to the edges with a spatula, aiming for an even layer. Bake for 23 to 25 minutes until the edges turn light golden but the center still looks just slightly underdone—it will finish cooking as it cools.
- Cool with patience:
- Leave the bars in the pan on a wire rack until they're completely cool, which means you can actually touch the center without it being hot. This waiting period is when they set up and become cuttable instead of crumbly.
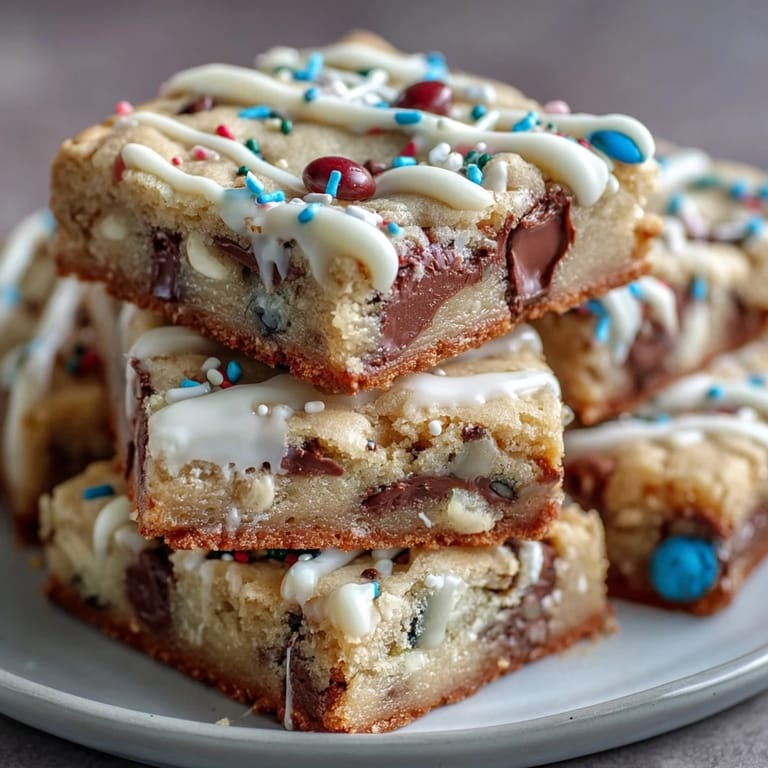
- Drizzle with drama:
- Melt your white chocolate with the vegetable oil in 20-second bursts in the microwave, stirring between each one until it's silky and smooth. Drizzle it over the cooled bars however you like—patterns, lines, random splatters, it all looks intentional.
- Set and slice:
- Let the drizzle harden completely (you can speed this up in the fridge if you're impatient), then lift the whole thing out using the parchment overhang and cut into 16 squares. The clean edges make this worth the extra minute.
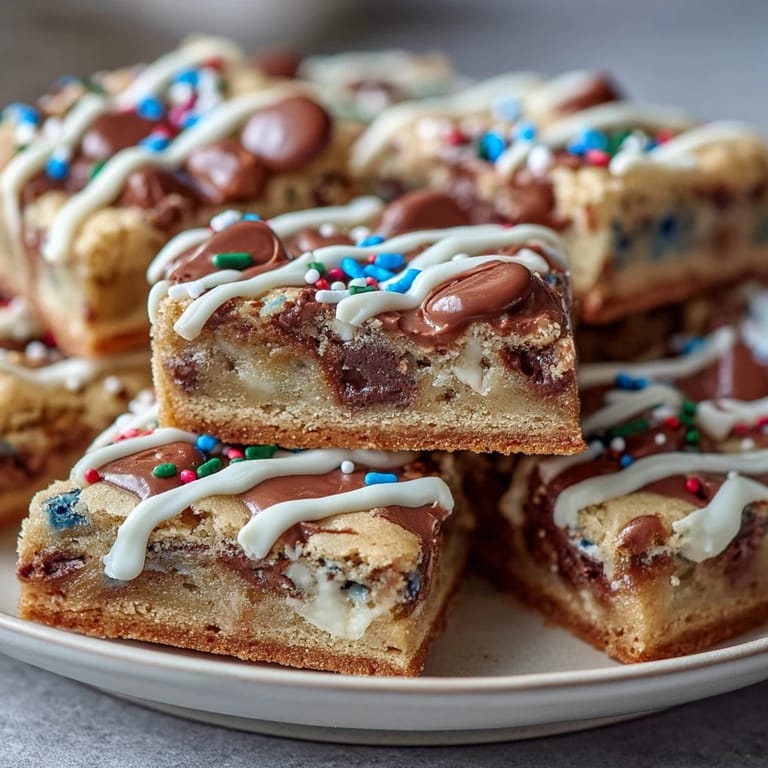
 Pin it
 The real magic happened when I saw that graduation student try one of these bars at the party and actually close her eyes for a second, like she was tasting something that mattered. That's when I realized these weren't just dessert—they were a small, edible way of saying congratulations and I'm proud of you, baked into a pan.
Customizing Your Color Story
The colored candies are your easiest way to make these bars feel personal and celebratory instead of generic. If you know the school colors, match them exactly—purple and gold, blue and white, forest green, whatever it is. You can also add sprinkles in matching colors right after drizzling the white chocolate while it's still tacky, and suddenly what was a simple bar cookie becomes something that looks like you designed it specifically for this moment.
Storage and Make-Ahead Magic
These bars keep beautifully in an airtight container at room temperature for up to four days, which means you can bake them the day before and spend less time cooking when the party actually happens. If you need to transport them to a celebration, stack parchment between the layers so the drizzle doesn't stick to other bars, and they'll look perfect when you arrive.
The Little Details That Matter
Sometimes the difference between good bars and bars people actually remember comes down to small choices you make while baking. Not opening the oven door is one, but there's also the texture difference between bars that are slightly underdone versus fully baked—underdone tastes chewier and more indulgent, fully baked tastes more like a traditional cookie. Pick whichever feels right for your mood and your crowd.
- Use real vanilla extract if you have it, because it changes the whole flavor profile in ways that matter when everything else is so straightforward.
- If you're worried about the white chocolate drizzle, practice on a plate first to see how it flows and breaks, then go for it on the actual bars.
- Leftover bars freeze beautifully for up to a month, so you can bake extra and have a celebratory dessert ready whenever you need a small reason to smile.
 Pin it
 These bars are proof that celebration desserts don't need to be complicated, just thoughtful and made with a little intention. They're the kind of thing that makes people feel noticed and glad to be invited to the gathering.
Recipe Questions & Answers
- → How do I prevent the bars from overbaking?
Bake until edges are lightly golden and a toothpick inserted comes out mostly clean to avoid dryness.
- → Can I substitute the colored candy coatings?
Yes, use any candy-coated chocolates to match your theme or preference.
- → What is the best way to melt white chocolate for drizzle?
Microwave in 20-second increments with vegetable oil, stirring until smooth to avoid burning.
- → Can I prepare these bars ahead of time?
Yes, store them in an airtight container at room temperature for up to four days to retain freshness.
- → What tools are essential for making these bars?
A 9x13-inch pan, mixing bowls, whisk, spatula, parchment paper, wire rack, and microwave-safe bowl are needed.