 Pin it
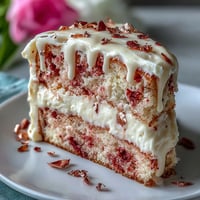
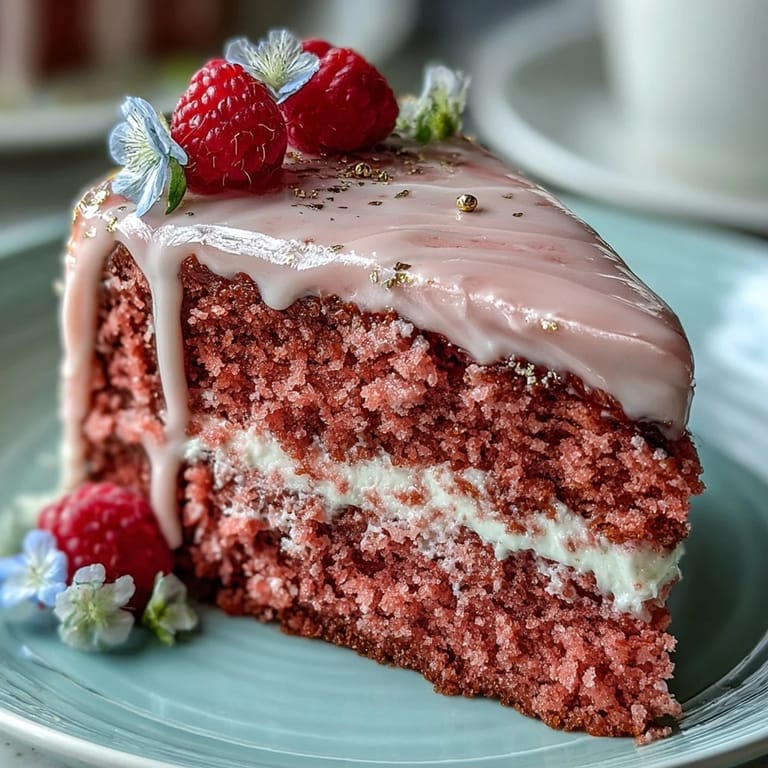
 Baking this Rosé Velvet Cake for a bridal shower felt like stirring a bit of magic into an ordinary afternoon—there was this soft scent of butter and rosé mingling as music played quietly in the background. Turning cake batter the faintest blush pink always feels a little rebellious, even if no one but you notices. I was skeptical about the gold drip, but as I mixed the luster dust, the kitchen buzzed with the anticipation of a masterpiece in the making. Sometimes, the best recipes aren't born from old family traditions but from the delight of wanting something beautiful to share. This cake quickly became one of those lovely exceptions.
One memorable Sunday, I made this cake for my sister's bridal shower and ended up with a crowd gathered around the kitchen, sneaking tastes of frosting and dipping their fingers into the ganache. Someone joked that painting chocolate with gold felt like being on a baking show. It wasn't just the bride-to-be who was impressed—even my uncle, who admits he only likes 'plain cake,' went back for a second slice. Laughter, frosting fingerprints, and a little bit of edible gold on my jeans made it a day to remember.
Ingredients
- All-purpose flour: The backbone of the cake, sift it to avoid lumps and ensure a light, even texture.
- Cornstarch: Separates the crumb just enough to give an extra tender bite; don't skip this if you want a bakery-style finish.
- Unsweetened cocoa powder: Only a touch, to deepen the flavor and enhance the pink color without turning things chocolatey.
- Baking soda: Helps the cake rise; measure carefully to avoid a soapy aftertaste.
- Salt: Just a little sharpness to balance the sweetness; I always use fine sea salt for even distribution.
- Unsalted butter: Room temperature is key for proper creaming and fluffiness.
- Granulated sugar: Provides sweetness and structure; beat thoroughly with the butter for airiness.
- Light brown sugar: Gives the cake a hint of caramel depth that pairs beautifully with rosé.
- Eggs: Add one at a time for a stable, emulsified batter—room temp helps them incorporate smoothly.
- Rosé wine: Go for a fruity, flavorful variety, and don't worry—most of the alcohol bakes out.
- Buttermilk: Makes the cake tangy and moist, preventing dryness.
- Vanilla extract: Enhances both the frosting and the cake with its warm aroma; real extract makes a difference.
- Pink gel food coloring (optional): Just a drop or two for a perfect shade of bridal blush, if desired.
- Cream cheese: Softened for easy mixing, it's what makes the frosting irresistible.
- Confectioners' sugar: Sifted for a smooth, cloud-like frosting without gritty bits.
- White chocolate chips: Melted carefully to form the perfect drip; high quality chips melt the best.
- Heavy cream: Loosens the ganache for an ideal dripping consistency.
- Edible gold luster dust: Your ticket to that dazzling, bridal moment; pick a reputable brand for the prettiest shine.
- Clear vodka or lemon extract: Turns the luster dust into paint—vodka evaporates quickly and won't alter the flavor.
Tired of Takeout? 🥡
Get 10 meals you can make faster than delivery arrives. Seriously.
One email. No spam. Unsubscribe anytime.
Instructions
- Get your pans ready:
- Lightly grease three 8-inch cake pans and line with parchment; you'll thank yourself when the cakes pop right out.
- Sift dry magic:
- Whisk flour, cornstarch, cocoa, baking soda, and salt until well-blended; this tiny extra step means no floury clumps.
- Cream to dreamy:
- Beat butter, white sugar, and brown sugar until pale and fluffy—listen for that soft slap against the bowl.
- Add eggs and vanilla:
- Drop in eggs one at a time, blending gently with each, then swirl in vanilla and watch it all come together.
- Mix up the rosé-buttermilk:
- Stir together wine and buttermilk in a jug; it might curdle a bit, but that's perfectly fine.
- Combine wet and dry, add color:
- With your mixer on low, alternate flour mixture and rosé-buttermilk into the creamed base, starting and ending with flour; add just enough pink gel for the prettiest hue.
- Divide and bake:
- Spoon batter into pans, smooth the tops, and bake for 28–32 minutes, until a toothpick comes out mostly clean.
- Cool off:
- Let cakes sit in their pans briefly, then turn them onto a rack—they'll finish cooling as you prep the frosting.
- Make the frosting:
- Beat cream cheese and butter until creamy, then gradually add sugar, vanilla, and a pinch of salt for extra lift.
- Stack and frost:
- Spread a thick swipe of frosting between each layer, then frost the whole cake; patience here pays off in a beautifully smooth finish.
- Create the gold drip:
- Gently melt white chocolate with cream until silky, cool till just warm, drizzle around the edge with a spoon, and watch it run down in perfect drips.
- Paint it gold:
- When drips are set, whisk together luster dust and vodka, then brush each drip (and a little extra if you're feeling artistic).
- Final flourishes:
- Add edible flowers or gold leaf for that celebration-ready flourish.
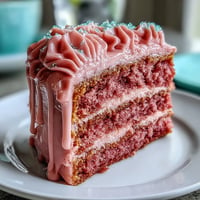
 Pin it
 The first time I sliced into this cake at a friend's shower, the soft pink layers and glinting gold drew a round of delighted gasps, but the real magic was seeing everyone's faces light up after that first bite. Moments like that make the kitchen feel less like work and more like a stage for celebration.
Make-Ahead and Storage Wisdom
One of my favorite kitchen tricks with celebration cakes: baking the cake layers the night before and wrapping them well keeps them super moist and makes assembling less frantic on party day. Frosting stores beautifully in the fridge, too—just give it a quick whip before spreading. The gold drip and paint want a chilled cake, so don't rush that step if you want those stunning streaks to stand out.
Decoration Adventures and Mishaps
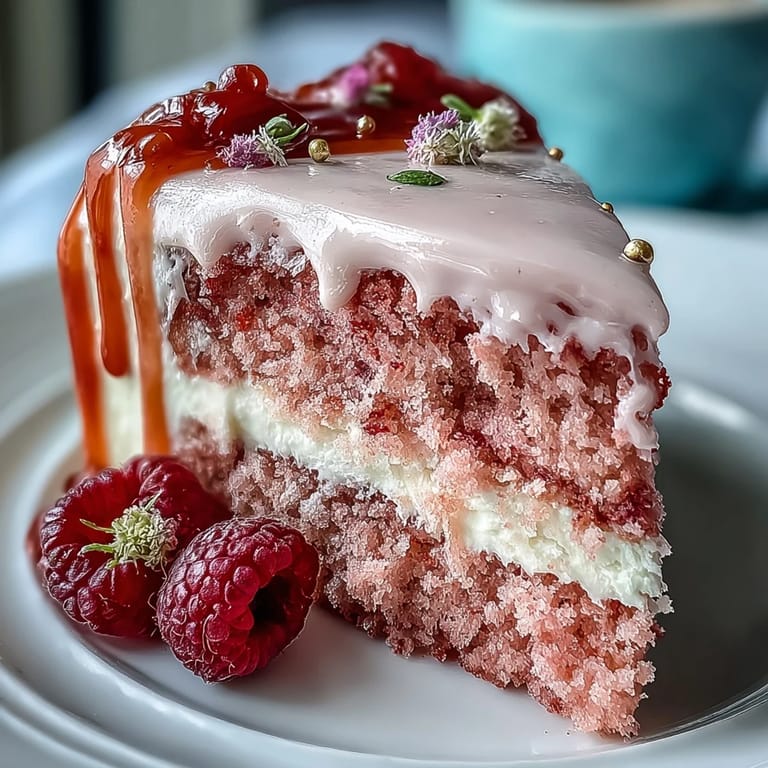
I once let my niece help with the gold painting, and she turned the drips into tiny hearts and squiggles—honestly, it only made the cake more special. If you're using edible flowers, put them on just before serving so they stay fresh and vibrant. The gold paint can be as messy as it is beautiful, so keep damp paper towels handy for wiping off stray brush marks.
Serving Highlights and Party Tricks
Chilled cake slices cleanly, but let it sit out for just a bit before serving so that the frosting becomes dreamy-soft. I like to set out bowls of fresh berries and a pot of extra rosé nearby for guests to help themselves. Don't be surprised if someone requests the recipe before the night is over—it's that kind of cake.
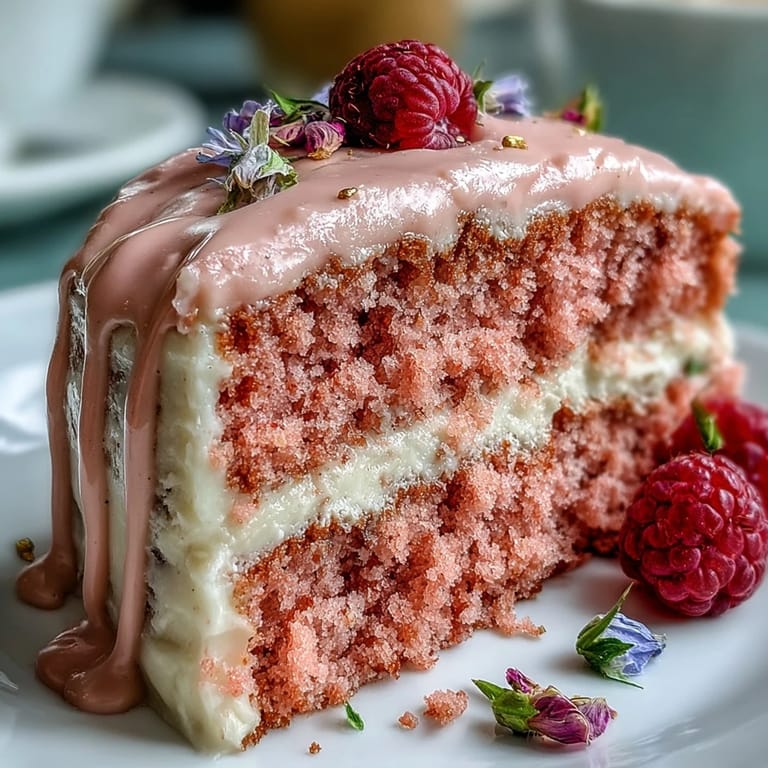
- Go gently when slicing, so you preserve the beautiful layers.
- Gold leaf flakes are delicate, so add with tweezers if your hands are warm.
- Remember to take a photo before it disappears—this cake is designed to dazzle!
 Pin it
 Here's to joyful celebrations and the moments when a beautiful cake brings everyone together. I hope this recipe makes your gathering as memorable as it made mine.
Recipe Questions & Answers
- → Can I make an alcohol-free version?
Yes. Substitute the rosé with pink grape juice or sparkling cider for the same fruity note. Adjust sweetness if needed and maintain the same wet-to-dry ratio for proper crumb.
- → How do I achieve a natural pink hue?
Omit artificial dye and use a small amount of reduced beet juice or a light pink fruit puree. Gel coloring gives the most vibrant blush with minimal moisture change.
- → How can I keep cream cheese frosting from being too soft?
Beat butter and cream cheese until just smooth, then chill the frosting before spreading if warm. Add a bit more sifted confectioners’ sugar for extra stability and work with chilled cake layers.
- → Tips for a smooth, controlled gold drip?
Cool white chocolate ganache until slightly thickened before dripping to control flow. Let the drips set in the fridge, then paint with edible gold luster dust mixed with a few drops of clear vodka or lemon extract for a shiny finish.
- → How should I store the finished cake?
Refrigerate covered for up to 3 days. Bring slices to room temperature 20–30 minutes before serving for best texture and flavor. Add fresh flowers just before serving to keep them vibrant.
- → Can I bake using different pan setups?
Yes. If using two pans instead of three, bake until set and split each layer horizontally once cooled. Adjust bake times and check doneness with a toothpick for even layers.